There is a huge misunderstanding of the severity of elevated residual moisture in concrete. Failure to properly test concrete and dry can lead to damaged/failed resilient new flooring, water migration to sill plates, cabinetry, drywall, concrete curling/cupping, cracking, expansion, tile repositioning and create bad indoor atmospheric conditions. Potential moisture-related issues are alkaline salts, concrete carbonation, sweating slab syndrome, efflorescence, cellulosic staining and discoloration. The effect on floor coverings from residual moisture in concrete slabs or moisture passing through concrete slabs from underlying soil has been demonstrated to be a crucial aspect to this process. As a result of the significant finding, in the early 1950s the Resilient Manufacturers Association (RMA) developed a moisture test method that is widely adopted by the flooring industry today.
Slab curling problems arise when a slab dries at a differential rate – faster on the top while remaining wet at its lower surface. Differential stresses due to shrinkage at the top and restraint at the bottom cause the slab's upward curling, leading to uncontrolled cracking.
Concrete should always be tested using ASTM standards. This ensures the loss has been restored to pre-loss conditions with no future issues or failures that can present litigation risks to restoration contractors. Many adjusters will say concrete is made to get wet or treat wet concrete as surface moisture. However, concrete moisture is complex and should always be addressed as another affected building material needing drying. Most contractors do not see concrete as an important material to dry or test.
Concrete may or may not have a moisture barrier. Moisture barriers under slabs vary and do not always make drying possible. From 1980 to 2002, the concrete standard was to install a "Blotter" (1980 - 980 edition of ACI). This industry standard was flawed because the permeability of sand is a highly absorbent material with nowhere for the moisture to travel beneath, leaving a high moisture content below the concrete slab and creating concrete curling due to the moisture differential from the bottom and top. The Blotter system was absorbed due to its porosity, and the barrier did not allow for bleeding of residual moisture.
I have found that our industry is not testing correctly and by far not enough. ASTM recommends three tests per the first 1,000 square feet and one additional (minimum) per every 1,000 square foot in addition to calcium chloride and in-situ probe testing. Non-penetrative moisture meter testing (ASTM F2659) by ASTM standards is subjective and qualitative. This testing method only tests up to one inch of the top layer and, due to equalization to atmospheric conditions, the top layer is always the driest layer. As a business owner and a 20-year expert in water mitigation, I have never performed non-penetrative moisture testing to the required standards.
ASTM F2659 states: The floor must be cleaned with no moisture migration systems, curing compounds, adhesives or coatings. The slab should be at service temperature. The shared occupied atmospheric conditions above should be at the same temperature and relative humidity at least 48 hours before moisture testing. If not possible, the test should be conducted at 65 to 85 degrees Fahrenheit and with a relative humidity of 40% to 60% rh. All accelerated drying machinery should be shut off for 96 hours before conducting tests.
The industry has not covered the ASTM proper testing procedures for each test conducted and this should be made into the IICRC S500 or a new standard for concrete moisture inspection and drying. There should be three to five tests in a 12-by-12-inch area as a single moisture inspection (point) location. You must have eight test sites (moisture points with three to five tests in one-square-foot area as one moisture point site) per the first 1,000 square feet, and an additional five test sites (moisture points) for any additional 1,000 square feet. It would help if you avoided testing areas in direct sunlight or near areas of direct heat. You must have a moisture test site in the center of the room and three feet from each exterior wall.
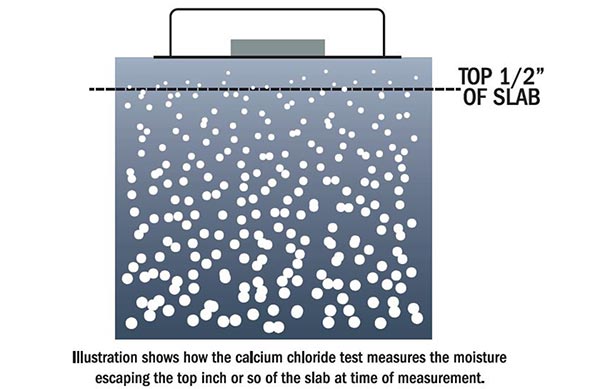
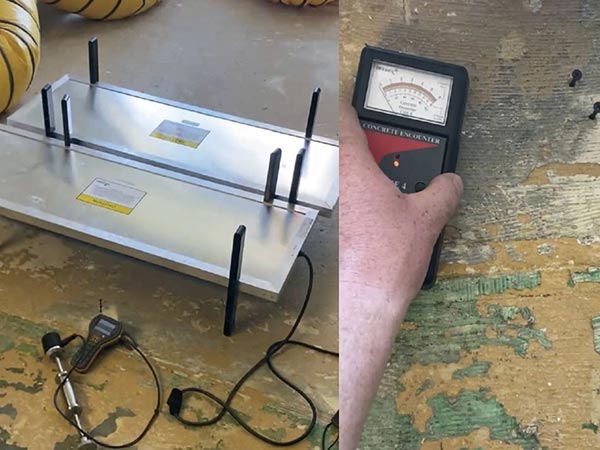
Calcium chloride vapor emissions tests need 30 days with no flooring covering slab before testing for final results. The atmospheric conditions must be at 65 to 85 degrees Fahrenheit with a relative humidity of 40% to 60% RH for 48 hours before conducting a test for the results. The area should be grinded, prepped and cleaned at 20-by-20 and ASTM F1869 standards should be used to conduct the test. The test should be no less than 60 hours and no more than 72 hours. Three tests are required for the first 1,000 square feet. After that, one test per 1,000 square feet after, and one test for anything fraction thereof.
The restoration industry should conduct a pH test (ASTM F710-19). Due to concrete’s pH between 7 and 10 (pH scale), it is very simple to test to see if the concrete has a pH issue. If there is a pH issue, there is a moisture issue. Ensure pH testing is floor prepped to the raw concrete surface. Sand the concrete surface with 100-grit sandpaper. Place a few drops of deionized water or distilled water the size of one inch for 55 to 65 seconds recorded on a timer and, using pH paper (quad is recommended), dip the pH paper and reference pH results to the chart. You can also use a pH pencil or a digital pH meter. Most flooring manufacturers require a moisture and pH test with their specifications and thresholds for warranty. In-situ probe testing, in my professional opinion, is where our industry is heading as a new standard. This test takes moisture readings in the core, not just the upper dryer level. (Core drilling 40% the concrete thickness, HEPA vacuuming.)
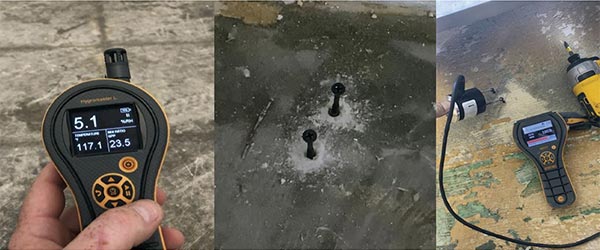
- Step 1: Clean the hole with a wire brush to remove debris and vacuuming to ensure the area is clean. This will guarantee no false readings.
- Step 2: Install the concrete hole sleeve and place the cap on top of the sleeve opening, making sure the sleeve edges overlap concrete and are sealed.
- Step 3: Test concrete after 24 hours in relative humidity and temperature. The threshold for ASTM F2170 says anything less than 75% RH is acceptable as dry.
However, I have found that specific manufacturers endorse their results threshold at below 90%. So, make sure you research your manufacturer's specifications for testing equipment and flooring manufacturers of whatever material is in contact with the floor or both.
The exact requirements apply: The atmospheric conditions must be at 65 to 85 degrees Fahrenheit with a relative humidity of 40% to 60% RH for 48 hours before conducting a test for results. Technicians should turn off all drying equipment for a minimum of 96 hours before conducting tests.
You're probably thinking the same way I initially did: How do we follow these guidelines in our field of work given the set of circumstances?
In my research, I have found that post-remediation testing should be conducted 96 hours to 30 days after drying has been performed. The post-remediation testing will ensure the atmospheric conditions are within the required temperature and relative humidity for 24 to 48 hours before testing. If the drying has been performed with no drying progress, four-inch core drilling may be necessary to check whether there is a moisture barrier, blotter or just aggregate.
This leads me to our next topic regarding concrete. There is very little literature and teaching regarding drying concrete, gypcrete, lightweight concrete. Besides the concrete being a Class 4 material, most contractors do not test or treat concrete as an essential material to dry. I have done my testing and concluded that heat works better than desiccated air. The combination of dry air and high surface temperature significantly shortens the drying time. The first 24 to 48 hours should have regular high air movement to evaporate unbound surface water.
The remaining time the concrete capillaries will retard if high cfm is used. Low cfm, along with direct heat, is the best drying method. Like an airplane wing, the low-pressure system that runs across the top of the surface creates lift, not the high-pressure system air beneath. The low-pressure system is the same concept when drying concrete. A temperature and air pressure differential will accelerate drying by 30% +/- 10% if access is underneath. Applying heat underneath will allow the heated air to travel to cooler air above, which creates a pressure system that allows the bound moisture to rise to the surface by water vapor diffusion and hydrostatic pressure.
Scenario
I recently dried a commercial loss with gypsum concrete on OSB subflooring (Oriental Strand Board). We removed the glued-down carpet and immediately placed air movement and desiccated air. The concrete and OSB were addressed as the final material to attempt to dry. After two days of drying, the air movers were replaced with Velo Pros with an amp adjustment feature to reduce the cfm. The heat was injected in the downstairs ceiling joists with positive air and the upstairs slightly cooler, but dryer atmospheric conditions and slightly negative air.
The strategic drying produced the heated air to travel to cooler places, which was intentionally the second floor. The pressure differential was intentionally created to strengthen the flow of the heated air to the second floor, causing the surface of the concrete to gain a surface temperature of 50 degrees. The combination of heat injected from the lower level, pressure differential and chilled desiccated air had immediate success. The loss was a retirement home where the elderly continued to use the facility hallways, and containment and tenting were not options. The blueprints showed the multi-direction of the floor joists to the second floor, where we strategically injected the heat, creating a channeled
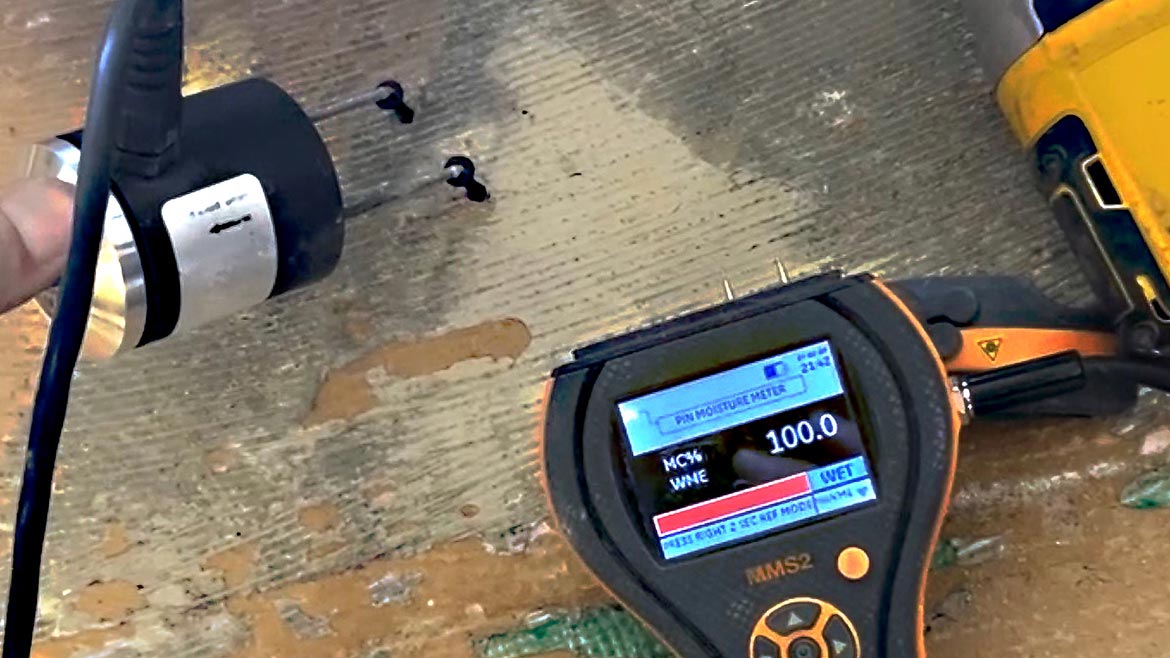
pressurized system. After the concrete measured equalization and to dry standards, we performed a more in-depth moisture testing method. The concrete was drilled on the second floor, and galvanized screws were drilled, creating a tight bond to the OSB substrate.
While using a penetrating moisture meter electrode prong touching the galvanized screws, we detected hidden moisture that the Tramex non-penetrative could not detect. The hammer probe where the penetrating holes were became bored out. Reusing the same hammer, we probed holes cause losing the proper contact to test electric resistance. Isolated areas of moisture were dried using infrared (IR) panels. Infrared panels are great in drying concrete as they directly heat effected wet materials and not the air. Infrared heat waves transfer energy and enhance evaporation by creating high vapor pressure (VP). Infrared panels increase the temperature of the material by 30 to 50 degrees.
Expansion Soil
I have spent most of my time researching why some concretes react differently than others. Through my years of research, I found that expansion clay aggregate under concrete has a huge impact. In my professional opinion, it is impossible to dry concrete permanently with expansion clay beneath as an aggregate.
Imagine expansion clay as a complexed Class 4 material. It absorbs water as a high-porous, fine material that closes the gaps for water to travel along with chemical compounds that bind to water molecules.
Aggregates are made up of sand, silt and clay, with the densest, most absorbent being clay. The particles in clay are small, fine and stick together easily. There are plenty of spaces for water migration, but the water can no longer flow once in the gaps, preventing drainage. Clay expands due to the specific minerals it possesses, causing expansion. Minerals such as montmorillonite, vermiculite and some sulfate salts affect how much the clay will expand. These minerals are absorbent and attract moisture by chemical compositions that bond with the water, causing a volume change, making the clay heavier and denser, creating a pressure system. This pressure system due to expansion happens when the clay no longer can absorb due to a change in porosity once wet, and the remaining will reach the water table. The pressure pushes water back to the path of least resistance and, in this case, is through the concrete. Hydrostatic pressure is the pressure exerted by a fluid due to the force of gravity. Since clay becomes dense (heavier) and expands, leaving no voids for water ultimately pushing it up.
A soil engineer may be necessary to create a solution in addressing residual moisture migration from expansion clay. I have researched and found that lime injection systems cause a hydrothermal reaction that helps dry clay.
ASTM References
- ASTM F1869 – Measuring Moisture Vapor Emission Rate of Concrete Using Anhydrous Calcium Chloride – Summary: Threshold of 3 lb. /1,000 sq. ft. per 24 hr.
- ASTM F710 Testing Concrete pH – Summary: Threshold of 7-10 pH
- ASTM F2170 Standard Testing Method for Determining Relative Humidity in Concrete Floor Slabs Using In-Situ Probes – Summary: Threshold of 75-90 RH
- ASTM 2659 Testing Concrete Using Non-Destructive Electronic Moisture Meter – Summary: Threshold of 2.5-3.5